Showing posts with label egg. Show all posts

Friday, February 10, 2017

Friday Egg: Taxi!

©Katy David 2016 "Taxi!" Chicken eggshell, aniline dye, varnish

A little grimy, a touch oversaturated, kinetic, maybe even frenetic. Reminds me of a big city. 

I made this one at the same time I made Senescence. I was exploring overworking an eggshell, just to see what would happen. The colors on this one are vivid, but slightly muddied by overwork. The edges are not as crisp, allowing for some seepage and even overlap of colors. Some of the wax came off during etching or washing back the color which adds another point of interest. 

Happy Friday!

©Katy David 2016 "Taxi!" Chicken eggshell, aniline dye, varnish

©Katy David 2016 "Taxi!" Chicken eggshell, aniline dye, varnish

©Katy David 2016 "Taxi!" Chicken eggshell, aniline dye, varnish


Friday, February 3, 2017

Friday Egg: Red Pineapple

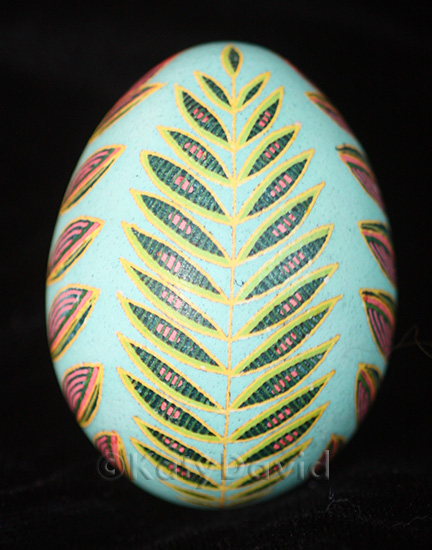
©Katy David 2016 "Red Pineapple" Chicken eggshell, aniline dye, varnish

A stylized floral pattern, reminiscent of a pineapple flower adorns this lovely little chicken egg. The back ground color is PUSA Patina, just a quick dip to make a lovely azure blue to contrast and complement the hot pink and magenta of the pineapple flower. The green ferns are along to keep it company. 

This piece found a home in December, so I hope that the person who owns is enjoying a little tropical moment of this chilly January day.

Happy Friday!

©Katy David 2016 "Red Pineapple" Chicken eggshell, aniline dye, varnish

©Katy David 2016 "Red Pineapple" Chicken eggshell, aniline dye, varnish

©Katy David 2016 "Red Pineapple" Chicken eggshell, aniline dye, varnish

©Katy David 2016 "Red Pineapple" Chicken eggshell, aniline dye, varnish

Friday, January 6, 2017

Friday Egg: Purple Clematis

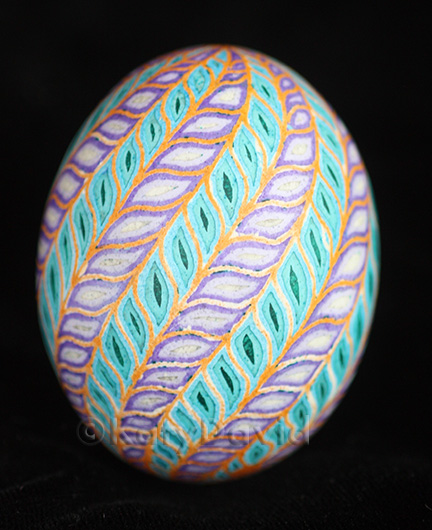
©Katy David 2016 "Purple Clematis" Chicken eggshell, aniline dye, varnish©Katy David 2016 "Purple Clematis" Chicken eggshell, aniline dye, varnish


A highly stylized clematis vine, climbing and twisting and reaching upward to the sky. 

I wrote out the process and divided it into steps so you could understand more clearly the process of layering that I go through to produce one of these pieces.

Step 1: I penciled in the equator, then the longitude and latitude lines and the halves of those lines, ending up with a grid. Then Ipenciled in a line where these lines connected that spirals up the egg. Once I have the basic geometry drawn in, then I can see where I am going and how to get there.

Step 2: I started waxing on a brown chicken egg, as you can see from the outlines of the vine and flowers. 

Step 3: After waxing, I etched the egg in vinegar to remove the brown outer layer and expose the lighter inner layer. 

Step 4: I then dipped the egg in UGS Light Blue and waxed the outer blue line of the leaf.

Step 5: Next I dipped the egg in PUSA Patina and waxed the second slightly more green line on the inner portion of the leaf. 

Step 6: I dipped again in PUSA Patina for a longer time than I normally would in order to get the dark green inner color of the leaves. 

Step 7: In order to ensure a bright and clear color, I washed the dye off with soap and water.

Step 8: I etched the surface again in vinegar to make the egg ready for more dyeing. 

Step 9: Now it was time for UGS Purple. I waxed the outer line of the petal.

Step 10: Then I rinsed the egg under running water to get just some of the dye off the eggshell, leaving enough so I could achieve a lighter purple color and waxed that inner line of the flower petal. 

Step 10: Finally, I washed the egg back down to the light creamy shell color and allowed the egg to rest for a few days. I like to give the egg time to dry out from all the processing it has been through. The heat of the oven can turn the moisture of all the dyeing and waxing that is in the eggshell to steam and cause seepage from the pores that shows as random white blobs. Sometimes I like that effect but sometimes I want to have a bit more control over the final design. If you look closely in the lightest part of the purple petals you can see dots of the blue-green color. Similar to what happens in the oven, the warmth of my hand as I hold and work on the egg heats the air inside the eggshell which forces the dye back out through the pores. I like that this eggshell added it's own signature to the piece.

Happy Friday!

©Katy David 2016 "Purple Clematis" Chicken eggshell, aniline dye, varnish

©Katy David 2016 "Purple Clematis" Chicken eggshell, aniline dye, varnish


©Katy David 2016 "Purple Clematis" Chicken eggshell, aniline dye, varnish

Friday, December 30, 2016

Friday Egg: Invisible Ink


©Katy David 2016 "Invisible Ink" Etched goose eggshell, varnish

An etched goose egg, the design revealed in relief rather than color. Simple and elegant.

Happy Friday!

©Katy David 2016 "Invisible Ink" Etched goose eggshell, varnish

©Katy David 2016 "Invisible Ink" Etched goose eggshell, varnish

©Katy David 2016 "Invisible Ink" Etched goose eggshell, varnish

©Katy David 2016 "Invisible Ink" Etched goose eggshell, varnish

©Katy David 2016 "Invisible Ink" Etched goose eggshell, varnish

©Katy David 2016 "Invisible Ink" Etched goose eggshell, varnish

©Katy David 2016 "Invisible Ink" Etched goose eggshell, varnish

©Katy David 2016 "Invisible Ink" Etched goose eggshell, varnish

©Katy David 2016 "Invisible Ink" Etched goose eggshell, varnish

Friday, December 2, 2016

Friday Egg: Gold Leaf


©Katy David 2016, "Gold Leaf" Etched goose egg, gold leaf. Available at camibaart.com

Another golden egg: This time it is an etched goose egg done in a ferny leaf pattern and then covered in sheets of 23.5K gold. So I called it Gold Leaf! Too obvious? Probably, but I could think of no other name once I thought of that one. I like that small bits of the white eggshell underneath peak out from between the leaves, the same way the sun might filter through a shady grove of trees.

As with any of my works, this piece is available through Camiba Art Gallery

Happy Friday!

©Katy David 2016, "Gold Leaf" Etched goose egg, gold leaf. Available at camibaart.com

©Katy David 2016, "Gold Leaf" Etched goose egg, gold leaf. Available at camibaart.com

©Katy David 2016, "Gold Leaf" Etched goose egg, gold leaf. Available at camibaart.com

©Katy David 2016, "Gold Leaf" Etched goose egg, gold leaf. Available at camibaart.com

©Katy David 2016, "Gold Leaf" Etched goose egg, gold leaf. Available at camibaart.com

©Katy David 2016, "Gold Leaf" Etched goose egg, gold leaf. Available at camibaart.com

©Katy David 2016, "Gold Leaf" Etched goose egg, gold leaf. Available at camibaart.com


Friday, October 28, 2016

Friday Egg: "Elliptical Red/Blue"


©Katy David 2016 "Elliptical Red/Blue" Goose egg, aniline dye, acrylic paint

Today's egg is an idea I have been working with this year. I have become fascinated with the interior of the eggshell and what the pores of the eggshell do with the dyes as I work my design on the outside. Usually, this beautiful scattering of colors is only seen after an egg breaks and at that point most people aren't in the mood to see how gorgeous it is inside. I want to bring this beautiful "conversation" between my work and the reaction of the eggshell to the fore without the disaster preceding the discovery, so I chose a goose egg that I was not particularly fond of and sawed about a quarter of the shell away to reveal the internal scene. And because I wanted this work to be about what was happening inside the eggshell, I decided to paint the exterior a matte black to hide my own half of the interaction and accentuate the beauty of what the eggshell had to say. In one of the photos, I took a close-up of the exterior and you can still see some of the etched outlines of my design in the black paint. One difficulty I had in photographing the work is that the dots of color are so beautifully diffuse that it is impossible to perfectly capture the image because it looks out of focus. This is definitely one that you should see in person if you can. 

Which you can! As I mentioned last week, the East Austin Studio Tour is coming up, Saturday and Sunday, November 12 - 13th, 19 - 20th from 11 a.m. to 6 p.m. all four days. I'm stop #75 on the tour. For more information on the tour or to find out where my studio is, go to http://east.bigmedium.org/.

If I have enough photos of my work, I may just keep posting works that you just have to see in person to entice you to come on the tour. 

Happy Friday!


©Katy David 2016 "Elliptical Red/Blue" Goose egg, aniline dye, acrylic paint

©Katy David 2016 "Elliptical Red/Blue" Goose egg, aniline dye, acrylic paint

©Katy David 2016 "Elliptical Red/Blue" Goose egg, aniline dye, acrylic paint

©Katy David 2016 "Elliptical Red/Blue" Goose egg, aniline dye, acrylic paint


©Katy David 2016 "Elliptical Red/Blue" Goose egg, aniline dye, acrylic paint


Friday, October 14, 2016

Friday Egg: Pinwheel!

©Katy David 2016 "Pinwheel" Goose egg, aniline dye

Color! Spinning patterns exploding from a central flower! All on a topsy-turvy starflower base. This goose egg was a lot of fun to make, but please don't ask me which colors I used or the order they were put on because I simply can't tell you. Every color! All the colors!

Happy Friday!

©Katy David 2016 "Pinwheel" Goose egg, aniline dye

©Katy David 2016 "Pinwheel" Goose egg, aniline dye

©Katy David 2016 "Pinwheel" Goose egg, aniline dye

©Katy David 2016 "Pinwheel" Goose egg, aniline dye

©Katy David 2016 "Pinwheel" Goose egg, aniline dye

©Katy David 2016 "Pinwheel" Goose egg, aniline dye

©Katy David 2016 "Pinwheel" Goose egg, aniline dye

Friday, October 7, 2016

Friday Egg: Blue Moonflowers

©Katy David 2016 "Blue Moonflowers" Goose egg, aniline dye

Revisiting a pattern that I love today with a more unusual colorway. These are hollyhocks done in turquoise with red outlines and black and gray stems. I started here with a goose egg dyed red. I outlined all the flowers and stems with beeswax and then washed the color back to white. Then I dyed the egg turquoise and rinsed it until it was a very light blue and waxed the inner petals. I dyed it again to a medium turquoise and waxed, a darker turquoise and waxed, and a final really dark turquoise color. Once all the blues were covered, I rinsed again and then dyed the egg black, waxed, and rinsed to gray. Once everything was waxed, I put it in a vinegar bath to etch so I could get some dimension to the design. You can't see it very well in this first photo, but in some of the close-ups you can get a better view.

Happy Friday!

©Katy David 2016 "Blue Moonflowers" Goose egg, aniline dye

©Katy David 2016 "Blue Moonflowers" Goose egg, aniline dye

©Katy David 2016 "Blue Moonflowers" Goose egg, aniline dye

©Katy David 2016 "Blue Moonflowers" Goose egg, aniline dye

©Katy David 2016 "Blue Moonflowers" Goose egg, aniline dye