Showing posts with label pysanka. Show all posts

Friday, January 6, 2017

Friday Egg: Purple Clematis

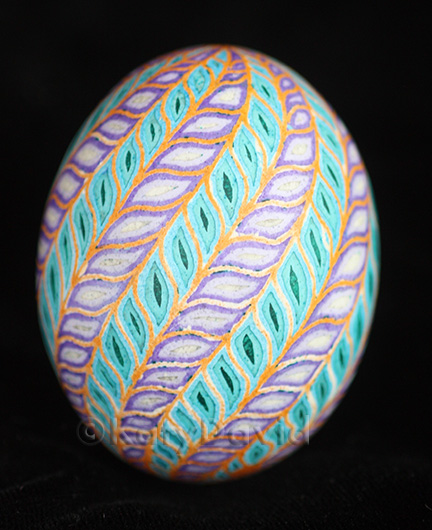
©Katy David 2016 "Purple Clematis" Chicken eggshell, aniline dye, varnish©Katy David 2016 "Purple Clematis" Chicken eggshell, aniline dye, varnish


A highly stylized clematis vine, climbing and twisting and reaching upward to the sky. 

I wrote out the process and divided it into steps so you could understand more clearly the process of layering that I go through to produce one of these pieces.

Step 1: I penciled in the equator, then the longitude and latitude lines and the halves of those lines, ending up with a grid. Then Ipenciled in a line where these lines connected that spirals up the egg. Once I have the basic geometry drawn in, then I can see where I am going and how to get there.

Step 2: I started waxing on a brown chicken egg, as you can see from the outlines of the vine and flowers. 

Step 3: After waxing, I etched the egg in vinegar to remove the brown outer layer and expose the lighter inner layer. 

Step 4: I then dipped the egg in UGS Light Blue and waxed the outer blue line of the leaf.

Step 5: Next I dipped the egg in PUSA Patina and waxed the second slightly more green line on the inner portion of the leaf. 

Step 6: I dipped again in PUSA Patina for a longer time than I normally would in order to get the dark green inner color of the leaves. 

Step 7: In order to ensure a bright and clear color, I washed the dye off with soap and water.

Step 8: I etched the surface again in vinegar to make the egg ready for more dyeing. 

Step 9: Now it was time for UGS Purple. I waxed the outer line of the petal.

Step 10: Then I rinsed the egg under running water to get just some of the dye off the eggshell, leaving enough so I could achieve a lighter purple color and waxed that inner line of the flower petal. 

Step 10: Finally, I washed the egg back down to the light creamy shell color and allowed the egg to rest for a few days. I like to give the egg time to dry out from all the processing it has been through. The heat of the oven can turn the moisture of all the dyeing and waxing that is in the eggshell to steam and cause seepage from the pores that shows as random white blobs. Sometimes I like that effect but sometimes I want to have a bit more control over the final design. If you look closely in the lightest part of the purple petals you can see dots of the blue-green color. Similar to what happens in the oven, the warmth of my hand as I hold and work on the egg heats the air inside the eggshell which forces the dye back out through the pores. I like that this eggshell added it's own signature to the piece.

Happy Friday!

©Katy David 2016 "Purple Clematis" Chicken eggshell, aniline dye, varnish

©Katy David 2016 "Purple Clematis" Chicken eggshell, aniline dye, varnish


©Katy David 2016 "Purple Clematis" Chicken eggshell, aniline dye, varnish

Friday, October 14, 2016

Friday Egg: Pinwheel!

©Katy David 2016 "Pinwheel" Goose egg, aniline dye

Color! Spinning patterns exploding from a central flower! All on a topsy-turvy starflower base. This goose egg was a lot of fun to make, but please don't ask me which colors I used or the order they were put on because I simply can't tell you. Every color! All the colors!

Happy Friday!

©Katy David 2016 "Pinwheel" Goose egg, aniline dye

©Katy David 2016 "Pinwheel" Goose egg, aniline dye

©Katy David 2016 "Pinwheel" Goose egg, aniline dye

©Katy David 2016 "Pinwheel" Goose egg, aniline dye

©Katy David 2016 "Pinwheel" Goose egg, aniline dye

©Katy David 2016 "Pinwheel" Goose egg, aniline dye

©Katy David 2016 "Pinwheel" Goose egg, aniline dye

Friday, October 7, 2016

Friday Egg: Blue Moonflowers

©Katy David 2016 "Blue Moonflowers" Goose egg, aniline dye

Revisiting a pattern that I love today with a more unusual colorway. These are hollyhocks done in turquoise with red outlines and black and gray stems. I started here with a goose egg dyed red. I outlined all the flowers and stems with beeswax and then washed the color back to white. Then I dyed the egg turquoise and rinsed it until it was a very light blue and waxed the inner petals. I dyed it again to a medium turquoise and waxed, a darker turquoise and waxed, and a final really dark turquoise color. Once all the blues were covered, I rinsed again and then dyed the egg black, waxed, and rinsed to gray. Once everything was waxed, I put it in a vinegar bath to etch so I could get some dimension to the design. You can't see it very well in this first photo, but in some of the close-ups you can get a better view.

Happy Friday!

©Katy David 2016 "Blue Moonflowers" Goose egg, aniline dye

©Katy David 2016 "Blue Moonflowers" Goose egg, aniline dye

©Katy David 2016 "Blue Moonflowers" Goose egg, aniline dye

©Katy David 2016 "Blue Moonflowers" Goose egg, aniline dye

©Katy David 2016 "Blue Moonflowers" Goose egg, aniline dye

Friday, August 26, 2016

Friday Egg: Carousel

©Katy David, "Carousel" 2016, Chicken egg pysanky

I'm baaaaaack! It's been a while! I've been out for summer break, traveling and dealing with a house renovation and the nuisances that come with it. But I'm back at the kistka as of Monday and really excited to be working on some new ideas.

This is a chicken eggshell done in bright and festive colors that reminded me of a circus carousel, just like the one we rode this summer at Valley Fair in Minnesota!

©Katy David, "Carousel" 2016, Chicken egg pysanky

©Katy David, "Carousel" 2016, Chicken egg pysanky

©Katy David, "Carousel" 2016, Chicken egg pysanky

©Katy David, "Carousel" 2016, Chicken egg pysanky